Create work items from monitoring alerts
Turn each alert from your monitoring tool into a Jira work item, through a URL that only your tool can call.
Problem: Alerts arrive by email or chat, and someone copies the important ones into Jira by hand. Some get lost, and the work item never says which alert started it.
Solution: Create a web trigger that checks a secret token, then creates a work item from the alert's title. Try it in the web trigger's test panel, then give the URL to your monitoring tool.
What you'll need
- Script Master for Jira, with an active license. See Get started.
- The Administer Jira global permission.
- A Companion App connected to Script Master. Web triggers run there. See The Companion App.
- A space for the work items, for example
DEMO, with the work type Task. - A long random token, for example from a password generator.
- A monitoring tool that can send an HTTP
POSTwith a header and a JSON body.
Set it up
1. Create the web trigger
-
In Script Master, select the Web Triggers tab, then Create web trigger.
-
In Title, enter
Create work items from alerts. -
In Backend JavaScript, paste this script and replace
<your-access-token>with your token:// The URL is public: reject every call without the tokenif (request.headers['authorization']?.[0] !== 'Bearer <your-access-token>') {console.warn('Call rejected: missing or wrong token');return { statusCode: 401, statusText: 'Unauthorized' };}let alert;try {alert = JSON.parse(request.body);} catch {return { statusCode: 400, statusText: 'Invalid JSON' };}const title = typeof alert.title === 'string' ? alert.title.slice(0, 200) : '';if (!title) return { statusCode: 400, statusText: 'A title is required' };const response = await api.asApp().requestJira(route`/rest/api/3/issue`, {method: 'POST',headers: { Accept: 'application/json', 'Content-Type': 'application/json' },body: JSON.stringify({fields: {project: { key: 'DEMO' },issuetype: { name: 'Task' },summary: `Alert: ${title}`,labels: ['alert'],},}),});if (response.status !== 201) {console.error(`Jira answered ${response.status}`);return { statusCode: 502, statusText: 'The work item was not created' };}const created = await response.json();return {statusCode: 201,headers: { 'Content-Type': ['application/json'] },body: JSON.stringify({ key: created.key }),}; -
Turn on Enable, then select Save. Web Trigger URL: now shows the URL.
2. Test it
-
Under the editor, turn on Test this Web Trigger.
-
Select Generate request example > POST request example with body.
-
In the request, set
headersandbodyto these values:"headers": { "content-type": ["application/json"], "authorization": ["Bearer <your-access-token>"] },"body": "{\"title\": \"Disk space low on build server\"}" -
Select Test. The Result panel shows
statusCode201and the new work item's key.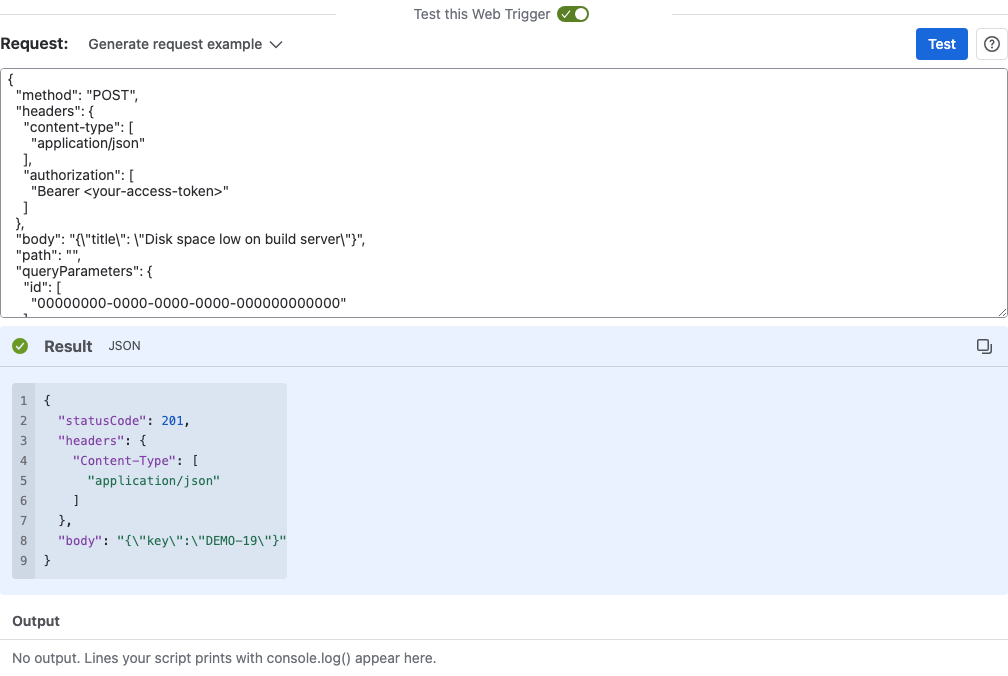
The test creates a real work item. Delete it in Jira when you're done.
3. Connect your monitoring tool
- Next to Web Trigger URL:, select the copy icon.
- In your monitoring tool, add a webhook that sends a
POSTto that URL, with the headerAuthorization: Bearer <your-access-token>and a JSON body such as{"title": "Disk space low on build server"}.
| Placeholder | Description |
|---|---|
<your-access-token> | Your token. Use the same value in the script and in the monitoring tool. |
What your team will experience
- An alert fires in the monitoring tool, and it calls the web trigger.
- A Task named
Alert:and the alert's title appears inDEMO, with the labelalert. - The team picks it up from the backlog like any other work item.
Check that it works
- Send a test alert from your monitoring tool.
- Confirm that a new work item with the label
alertappears inDEMO. - On the Web Triggers tab, select the latest run in the web trigger's History column. Confirm that it shows no errors.
To check the token, send one call without the Authorization header, for example from a terminal:
curl -X POST '<web-trigger-url>' -H 'Content-Type: application/json' -d '{"title": "Test"}'
It gets 401 and creates nothing.
| Placeholder | Description |
|---|---|
<web-trigger-url> | The URL you copied from Web Trigger URL:. |
Related use cases
- Flag stale work items every night: a server script that runs on a schedule.
- Require a token on a web trigger: why the token check comes first.
- Test a web trigger: the request format and what the test panel shows.