Create a gadget
Create a gadget so people can add your own block to their Jira dashboards. You write the code, check it on one of your dashboards in the live preview, then turn it on.
Applies to: Script Master for Jira · Cloud
Before you begin
- Jira permission: Jira admin (the Administer Jira global permission). Only Jira admins can open Script Master.
- App permission: an active Script Master license. Without one, you can't create gadgets.
- The site has fewer than 100 gadgets.
Open the editor
-
In Script Master, open the Gadgets tab. On a narrow window it can sit under More.
-
Choose how to start:
- Select Create gadget for an empty editor.
- Select the arrow next to Create gadget (More ways to create) > From a template, then pick Markdown notes, My dashboards or Weather.
- Select the arrow > Import to paste a gadget exported from another site. See Import, export and duplicate.
Before the first gadget, the tab shows Create gadget, From a template and Import as separate buttons.
The editor opens. A template fills in the title, description and code.
Fill in the gadget
-
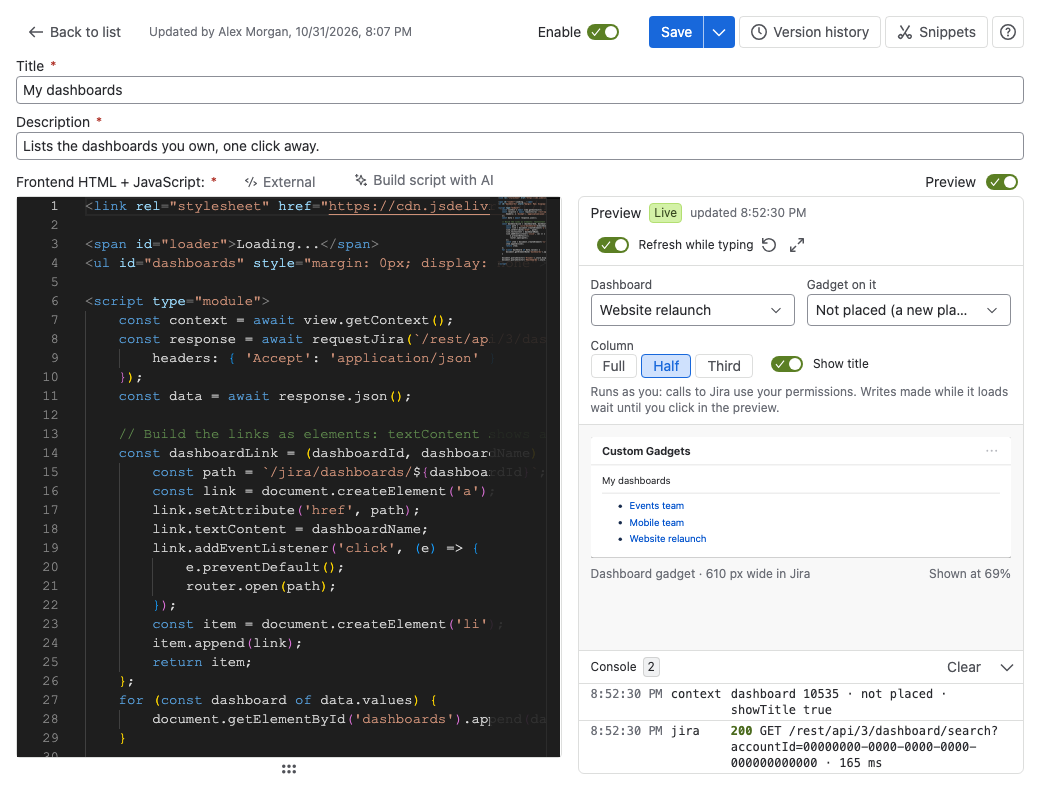
In Title, enter the name dashboard editors see when they pick a gadget. Up to 128 characters.
-
In Description, say what the gadget shows. Dashboard editors see it under the title. Up to 256 characters.
-
In Frontend HTML + JavaScript, write the gadget's code. Put JavaScript in
<script>tags. See Write fragment code, which applies to gadgets too.
All three fields are required.
Check it in the preview
The preview beside the code runs the gadget. Set what it runs against in the fields the preview shows, or later by selecting the pick at the left of its toolbar. To see the gadget on a dashboard, turn on Show Jira's frame in Preview options (•••):
| Field | What it sets |
|---|---|
| Dashboard | The dashboard in the gadget's context. The preview starts on your first dashboard |
| Gadget on it | A Script Master gadget already on that dashboard, or Not placed (a new placement) |
| Column | The gadget's width: Full, Half or Third |
| Show title | Whether the gadget's title row shows above it, as on a dashboard |
Code that reads or writes the gadget's own settings, like the Markdown notes template, needs a placed gadget. With Not placed (a new placement), the context has no gadget ID.
Writes in the preview wait until you select something inside it, and then they're real. See Preview your code.
Save and turn it on
- Select Save, or press
Ctrl+S(Cmd+Son a Mac). To add a note to this version, select the arrow next to Save > Save with note…. - Turn on Enable at the top of the editor.
- Select Save again.
Result: Script Master shows "Gadget saved!" with the version number. Dashboard editors can now pick the gadget in Custom Gadgets. See Add a gadget to a dashboard.
Change or remove a gadget
In the Gadgets tab, select the gadget's name to open it. Each row's ••• menu also has Version history…, Turn on or Turn off, Duplicate, Export and Delete….
To delete a gadget:
-
In the gadget's row, select ••• > Delete….
-
Select Delete to confirm.
warningDeleting can't be undone. Its failure record and version history go with it. Dashboards that show it say This gadget was deleted until someone removes it there.
Result: The gadget is gone from the list.
Related
- Gadgets: what happens on dashboards when you turn a gadget off or delete it.
- Preview your code: the status, the console and held writes.
- Version history: compare and restore earlier versions.
- Failures: what the list and editor show when a gadget fails.